

If you suffer from an unreliable network on your smartphone but have a strong Wi-Fi connection, you have the option to take advantage of Wi-Fi calling. With this, voice calls are routed via Wi-Fi instead of your carrier’s network. The benefit of using Wi-Fi calling is that it does not add to your bill and improves voice clarity.
However, the feature doesn’t always work perfectly. If Wi-Fi calling won’t work on your Android smartphone, have a look at the fixes below that can get it going again.
How Does Wi-Fi Calling Work?
As the name suggests, Wi-Fi calling uses a Wi-Fi connection to place normal phone calls. This is especially useful when mobile reception is poor at your home or office. The feature is available on Android devices as well as the iPhone.
As the phone call takes place over Wi-Fi, there’s a lower chance of the call being dropped, as long as you’re on a stable network. If you’re interested in knowing more, we’ve already covered what Wi-Fi calling is and its uses in detail.
Besides that, here are some fixes to try if Wi-Fi calling isn’t working on Android. As with most Android tips, the menus and options may differ slightly depending on your device and version of the OS.
1. See if Wi-Fi Calling Is Enabled in Settings
The first thing you should check is that the Wi-Fi calling feature is turned on. It is possible that you may not have enabled this yet, or that you may have disabled it by mistake. Most phones don’t come with the feature turned on, since it can be both carrier and device-dependent.
To check if Wi-Fi calling is turned on, follow these steps:
- Launch the Settings app on your Android phone.
- Use the search bar to look up Wi-Fi calling. Alternatively, you can head to Network & internet > Mobile network.
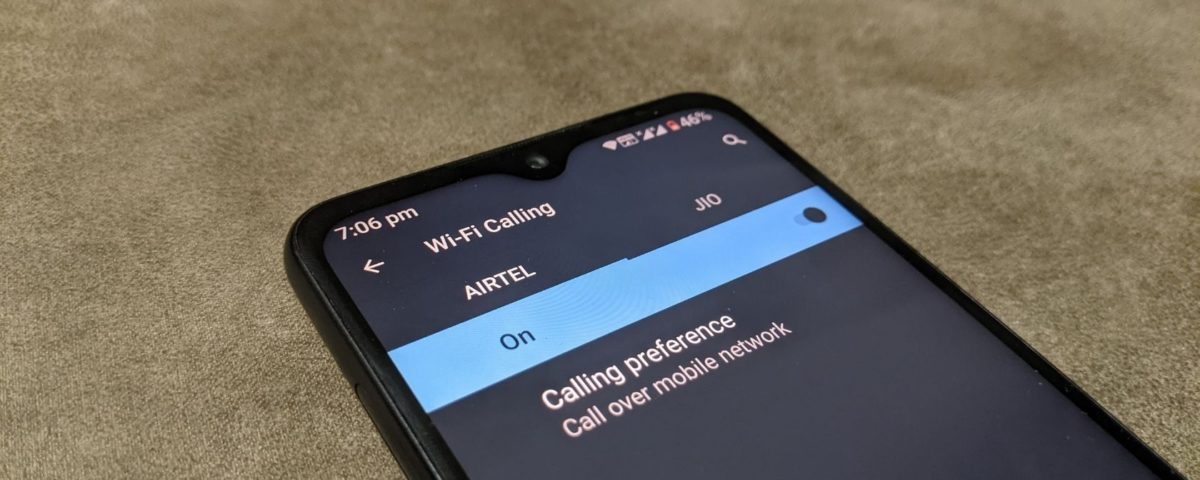
- You will find the Wi-Fi calling option there.
- Tap on the toggle to enable the feature.
When making calls, you should now see Wi-Fi next to the carrier symbol in the status bar.
2. Restart Your Router and Phone
If the Wi-Fi calling option is turned on but isn’t working properly, try restarting your phone and router. It’s always a good idea to do so when you run into Wi-Fi calling-related issues or face temporary glitches in your phone. It’s a fact that you can easily solve the majority of issues by simply restarting your device.
To restart an Android phone, press and hold the Power button till the power options are available. Then tap on Restart. This should clear up issues like a temporarily slow Wi-Fi connection.

3. Check for New Software Updates
With any phone issue, you should always check for new software updates. If there are any available, they might fix the problem you’re encountering, so you should install them.
Here’s how you can check for software updates on your device:
- Open the Settings app.
- Head to System (or About phone on older devices).
- Look for Updates or System update, which is often under the Advanced menu.
- Tap on Check for updates and install any new updates that are available.


4. Check if Your Phone and Carrier Offer Wi-Fi Calling
If your carrier doesn’t support Wi-Fi calling, then the feature will obviously not work on your Android phone. Similarly, your smartphone must also support the function.
Moreover, if you don’t see the Wi-Fi calling feature anywhere in the Settings app, as mentioned in #1 above, your device probably doesn’t support this feature.
You should also look online or contact your mobile carrier to find out if Wi-Fi calling is available on its network. If your carrier doesn’t offer it, ask when it is expected. You may also consider switching to a new provider if Wi-Fi calling is a must-have feature for you.
5. Confirm Wi-Fi Is Enabled and Working
Wi-Fi calling requires a stable Wi-Fi connection. Make sure that the Wi-Fi toggle on your phone is enabled, you’re properly connected to your network, and that you’re within range.
If you’re having trouble with your connection, take a look at our guide on how to improve your Wi-Fi signal. It will also help you extend your Wi-Fi range, ensuring that you never lose signal again.
You can turn Wi-Fi on via the Quick Settings panel (accessed by dragging down twice from the top of the screen) or by opening the Settings app and going to Network & internet > Wi-Fi.


To test your network once connected, open your browser and check if websites load properly, or if YouTube videos play as you’d expect. If your network isn’t working right, then Wi-Fi calling will not work either. You may need to troubleshoot your home internet more extensively if this is the case.
6. Remove and Reinsert the SIM Card
If restarting the device doesn’t work, turn it off completely and then remove, clean, and reinsert the SIM card in your Android phone. Also, make sure to use a clean microfiber cloth to clean the SIM card before putting it back into your device.
When reinserting your SIM card, use extra caution because a hard push can damage the SIM’s gold contact area. Once done, the carrier may send your device certain configuration settings, which you should confirm.
7. Use Airplane Mode to Force Wi-Fi Calling

Many carriers state that even with Wi-Fi calling enabled, your phone will still use the cellular network to make calls if the signal is strong enough. If your mobile signal is strong at home, this could be why calls don’t go through Wi-Fi calling.
To fix this, first put your phone in airplane mode. This will disable all wireless radios, including your phone’s connection with your carrier’s network. Next, enable Wi-Fi from the Quick Settings panel as mentioned above. This will allow you to connect to Wi-Fi while staying disconnected from your mobile network.
This is a good solution when you need to make a specific call using Wi-Fi calling. Just remember to disable airplane mode when you go out, so you don’t miss calls and texts while away from Wi-Fi.
8. Try a Different Wi-Fi Network
There might be something blocking Wi-Fi calling on your home network, like a setting on your router. To test this, you should try connecting to a different Wi-Fi network, such as one at your office or a friend’s house, to see if it works there.
If it does, then the issue most likely lies with your router. You should open your router’s settings panel and look for an option that blocks Wi-Fi calling. It may be worth speaking to your ISP about this, too.
9. Reset Network Settings
If you’re still struggling, resetting network settings is your last avenue, and it will undoubtedly help you if Wi-Fi calling has stopped working on your phone.
This will not erase any data on your phone; it only resets your wireless, mobile data, and Bluetooth settings. Keep in mind that you’ll need to reconnect to saved Wi-Fi networks, configure VPNs, and redo similar network tasks after this.
To reset your phone’s network settings, follow these steps:
- Go to Settings and tap on System > Advanced > Reset options.
- Here, tap on Reset network settings or Reset Wi-Fi, mobile, & Bluetooth.
- Confirm the operation. After resetting network settings, reconnect to your Wi-Fi network, then see if Wi-Fi calling works properly.


This feature varies from device to device, so you may want to search for «Reset Network Settings» or something similar via the search option in the Settings app if you can’t find it.
Fixes For When Wi-Fi Calling Stops Working
There are plenty of ways to fix the problem when Wi-Fi calling is not working on your Android phone.
Now you know how to make sure your carrier supports the feature, fix any temporary bugs, and confirm that it is enabled. You can now enjoy the convenience of calling over Wi-Fi on Android!

Read Next
About The Author


