Do you need to transfer files from Mac to Windows and vice-versa? You can take a few different approaches, but you can easily do a Mac to Windows or PC to Mac file transfer using both operating systems’ native tools.
Alternatively, there are a few third-party solutions worth checking out. Below, we’ll explain how to transfer files from Mac to Windows and vice-versa.
How to Transfer Files From Mac to Windows PC
The most obvious way to transfer files from Mac to Windows is to use the built-in functions that both operating systems offer.
However, this has one significant drawback. The process will only work if both the Mac and Windows computers are on the same local network. If they aren’t, you can skip ahead to the section on third-party solutions below.
Set Up File Sharing on a Mac
You’ll need to tweak some settings to share files between a Mac and PC. First, you need to allow your Mac to share its files. Follow these steps to do this:
Click on the Apple icon in the upper-left corner of the screen. Choose System Preferences > Sharing. Then, enable the checkbox next to File Sharing in the left panel.
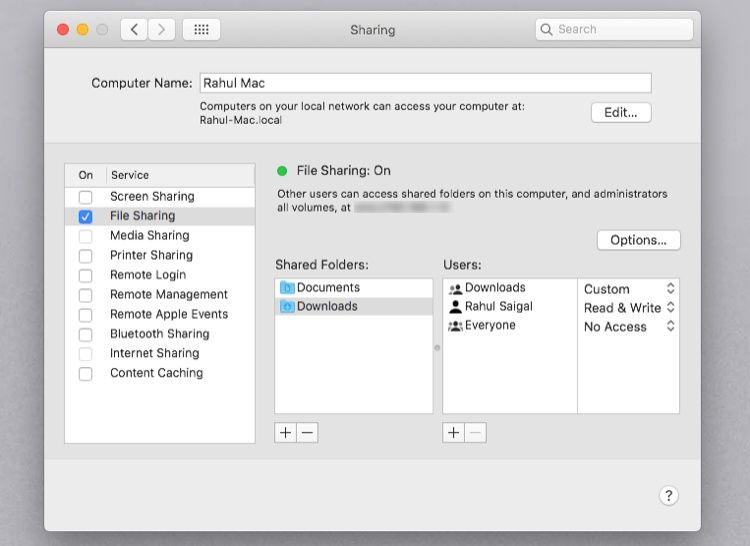
Click on the Options button and, from the window that appears, enable the checkbox next to Share files and folders using SMB. In macOS Big Sur, Apple dropped the ability to share volumes via AFP. Although Catalina retained this ability, you could not share APFS-formatted volumes over AFP.
In the Windows File Sharing section below, enable the checkbox alongside each user whose files you want to share. Enter the users’ passwords and click Done.
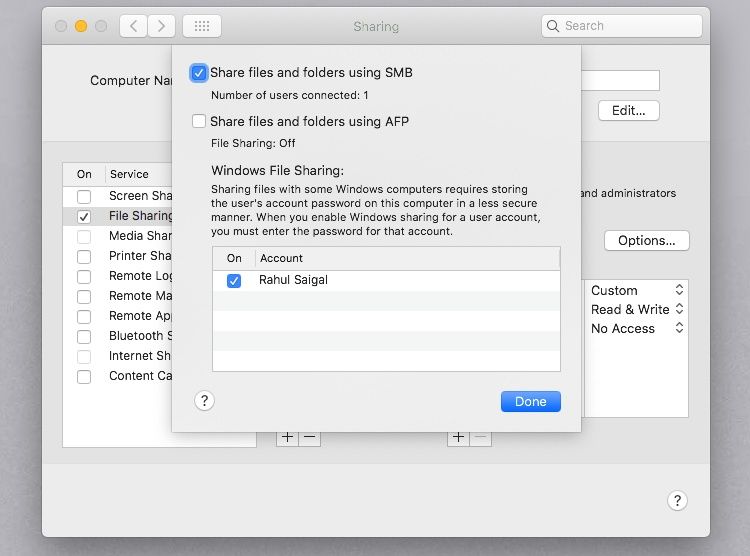
When you’re sharing files with Windows computers, your Mac stores the users’ passwords less securely. Upon completion, we recommend you deselect the user checkboxes.
You’ll now be back on the Sharing window. Next, you need to choose which folders and users you’re going to share with your Windows computer. Click the Plus (+) and Minus (–) buttons below Shared Folders to adjust your preferences.
Once you have shared a folder, review the users’ permissions and groups that should have access to the data in the Shared Folders list.
Remember that all network access is controlled by the computer with the shared resources (in this case, it’s your Mac); therefore, you must understand what Mac permissions have been applied to a folder. Finally, you need to note your Mac’s IP address. You will see this below the File Sharing: On message.
Access Mac Files on Windows
Now it’s time to head to your Windows computer. Follow the instructions below to transfer files from Mac to Windows:
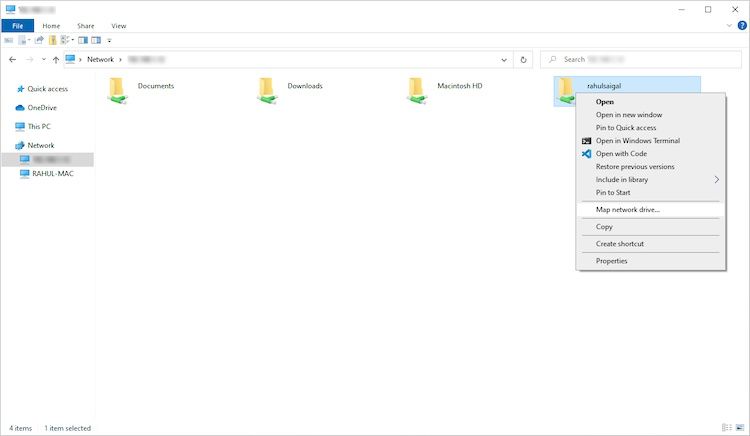
Open File Explorer. In the address bar at the top of the window, type \ followed by your Mac’s IP address. When you’re done, it should look something like this: \192.168.1.68. A new window will pop up asking for a username and password. Enter the user credentials exactly as they appear on your Mac.

File Explorer will display any folders and users you’ve added to your Mac’s Shared Folders and Shared Users lists. You can map that folder as a network drive to move, edit, and copy folders like any other Windows folder.
Map Network Drive
Mapping a network folder makes it appear to other apps that the folder is part of your computer. Windows assigns a drive to the mapped folder, and you’ll see it as a drive in the File Explorer.
Right-click the shared folder and click Map network drive. Select a drive from the Drive list. You can choose any letter that’s not already in use.
The Folder box contains all the pre-filled information. Don’t forget to check Reconnect at sign-in if you want Windows to connect to this shared folder at the start of each login session automatically.

Once you’re done, drag-and-drop files into one of your local folders to transfer files from your Mac to your Windows PC.
How to Transfer Files From PC to Mac
That wasn’t too tough, right? Now let’s look at the reverse process: how to transfer files from Windows to Mac.
Set Up File Sharing on Windows
To begin, you need to make sure that Network Discovery is turned on in Windows. Fire up your Windows PC and work through the following steps:
Open the Settings app and go to Network & Internet. On the left panel, click on Ethernet or Wi-Fi and then Change advanced sharing options located under Related settings.
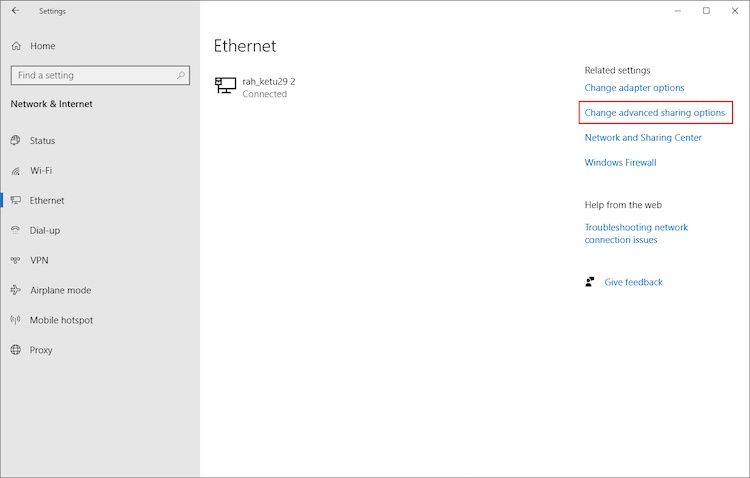
Expand the Private Network menu and enable the checkboxes next to Turn on network discovery and Turn on file and printer sharing. Then, click on Save changes. Follow these steps to fix network discovery-related issues in Windows 10.
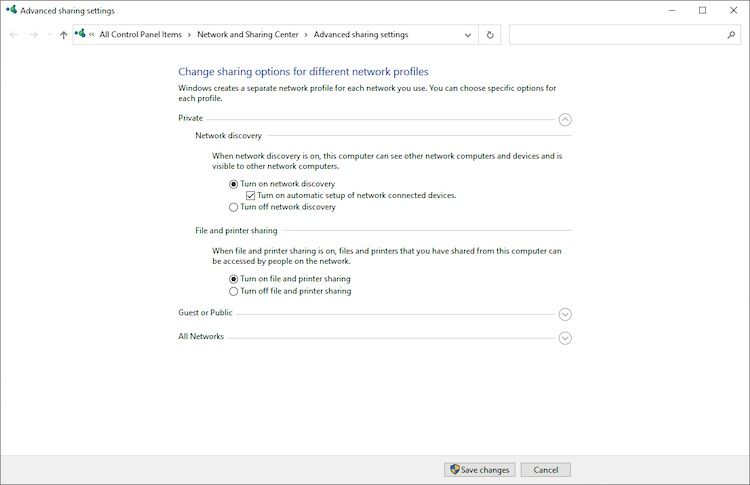
We don’t recommend enabling network discovery or file sharing on public networks. They are typically far less secure than private networks.
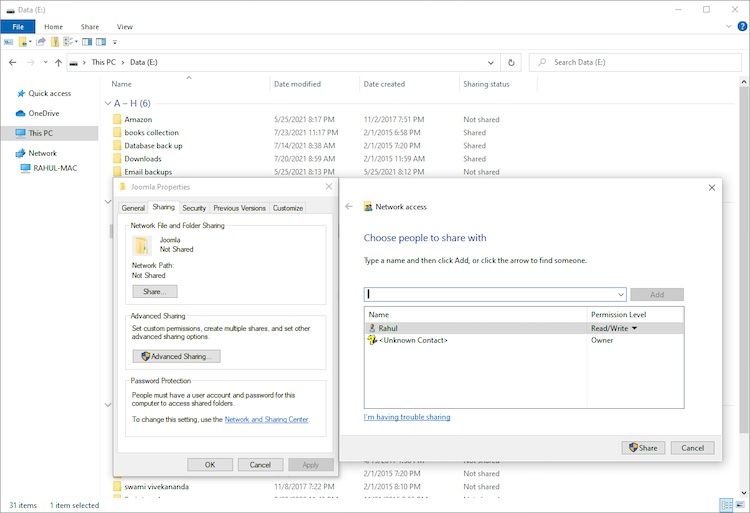
To share folders on a case-by-case basis, right-click on the folder’s name and go to Properties > Sharing > Network File and Folder Sharing > Share. Alternatively, you can use advanced sharing settings if you need to or if you prefer to have full control over sharing.
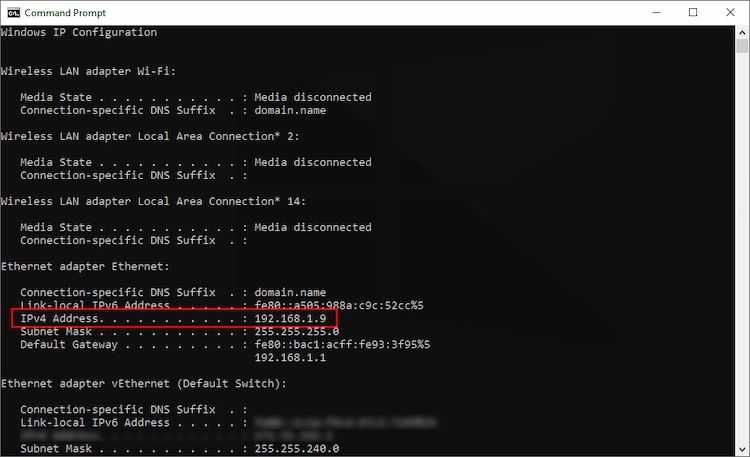
You’ll also need to note your Windows PC’s IP address. Press Win + X and choose Command Prompt or Windows Powershell. Type in ipconfig and note down the IPv4 address.
Access Windows Files on Mac
Once you’re happy with your sharing options, it’s time to transfer your files from Windows PC to Mac. Follow the steps below on your Mac to do this:
Open the Finder app. In the menu bar at the top of the screen, select Go > Connect to Server. Type either smb://[IP address] or smb://[computer name] and press Enter. You will be prompted to enter your Windows username and password. Click on Connect.
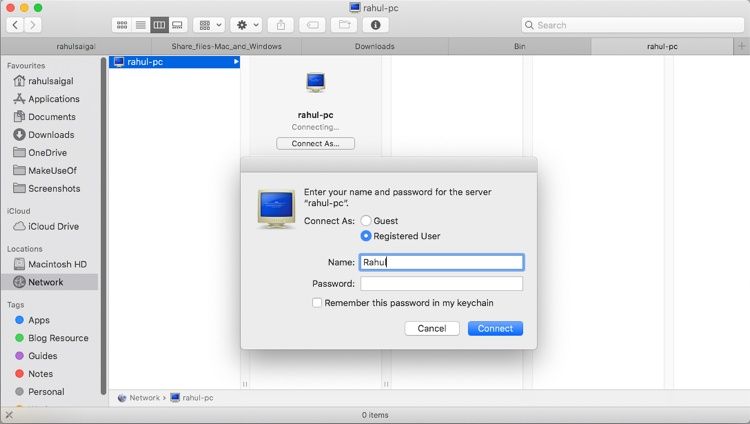
Your shared Windows content will be available in the Shared section of Finder. To transfer files from your PC to your Mac, just drag and drop as needed.
Other Ways to Share Files Between Mac and PC
The above methods work great if both Mac and Windows PC are on the same network. However, if they’re not, try these methods and choose the ones that fit best for you.
1. Use a Cloud Storage Service
Dropbox, Google Drive, and OneDrive have dedicated apps available for Windows and macOS. Just install them on the two systems and upload or download your files as needed. Be aware of the space taken up by these apps, and if you’re running low on disk space, follow our guide on how to sync only specific files in Dropbox or Google Drive.
2. Use a USB Stick
A simple-but-effective solution for anyone who needs to transfer files from Mac to Windows quickly is to use a USB flash drive. Remember to choose the exFAT file format since it’s compatible with both operating systems and easily lets you share huge files. Here are our recommendations on the best USB 3.0 flash drives available online.
3. Share Files Without Using Cloud Storage
Resilio Sync and Syncthing are file-syncing apps that let you share files between Windows and Mac. They use an encrypted key to manage the connection between devices. All you have to do is set up a sync folder and create a key. Share the key with your other machine and nominate a folder. Both the apps allow you to set up the read/write permissions.
There are plenty of security challenges we face regarding cloud storage. This author has been using Resilio Sync for many years. If you set up permissions, configure sync to force LAN syncing, and use Archive for file versioning, you ensure that the data transfers happen through your network and save money.

Transfer Files Between Computer and Mobile
Hopefully, the various methods we’ve discussed will help you share files between a Mac and a PC with ease. If you also need to do this with your phone, check out the easiest ways to transfer files between computers and mobile devices.
We hope you like the items we recommend and discuss! MUO has affiliate
and sponsored partnerships, so we receive a share of the revenue from some of your purchases. This
won’t affect the price you pay and helps us offer the best product recommendations.
Read Next
About The Author


