If you use an iPad, iPhone, or Mac, there’s no doubt that Apple Notes is one of your go-to note-taking apps. This app is simple to use and effortlessly syncs your notes on iCloud. That means you can access your notes from different Apple devices; a very convenient feature. But, the usefulness of Apple Notes doesn’t end there. Among other things, you can also export your notes as a PDF.
Do you want to export your Apple Notes to PDF files on your iPhone, Mac, or iPad? We’ll show you how.
How to Save Apple Notes as PDF on Any Device
Apple Notes has many useful features that you should be using. For instance, instead of copying your notes to another platform, Apple Notes makes the whole process a cinch through export to PDF functionality. The only downside is you can’t export multiple notes simultaneously.
You can, however, export notes from Apple Notes as PDFs from your iPhone, iPad, or Mac. We’ll cover all three platforms.
Export Apple Notes as PDF on iPhone and iPad
If you’re on iPhone or iPad, here’s a step-by-step guide on how to export your Apple Notes to PDF:
- In Notes, open any note to export as a PDF.
- Once in the note, tap the ellipsis (…) icon at the top.
- Select Send a Copy.
- Tap Markup to generate a PDF. On the markup page, you can annotate your PDF before exporting. Select any markup tool, customize it and annotate the PDF.
- Once you’re happy with your PDF, tap Done. Apple Notes will ask you to save your PDF.
- Tap Save File To and select an appropriate location on your iPhone or iPad.
- Finally, tap Save.
On iPhone and iPad, the markup feature comes to your rescue when exporting Apple notes. Besides working for regular notes, you can also use the markup feature to export scanned documents from Notes using the steps above. However, the steps slightly vary if you have a scanned document with multiple pages.
Here’s how to export a scanned document with multiple pages in Apple Notes:
- First, open the scanned document.
- Tap and hold on to one of the pages while in preview and select Share from the pop-up menu.
- Select Markup and annotate your document if you’d like.
- Finally, tap Done > Save File To, and select a location to save your PDF file.
- Tap Save to finish.
Check out our standalone article to discover other ways to get the most out of the markup feature.
Export Apple Notes as PDF on Mac
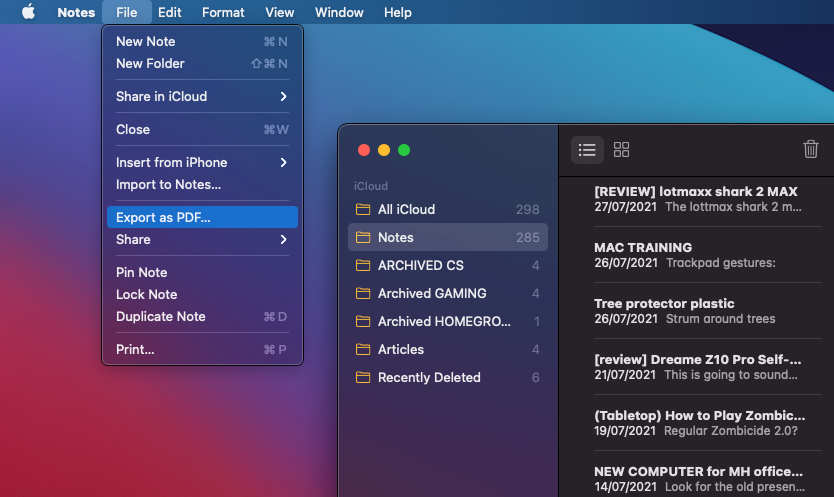
On a Mac, the process is more straightforward. Here’s how to export notes from Mac:
- Launch the Notes app and open a note you’d like to export as a PDF.
- Click File from the menu bar.
- Select Export as PDF.
- Rename your PDF file, select where to save, and add some tags if you want to.
- Click Save to save your PDF.

Take Your Apple Notes Wherever You Go
Apple Notes is among the best note-taking apps for iOS, iPadOS, and macOS. However, the app is of no use if you switch to other non-Apple platforms like Android and Windows. Exporting your notes is one way to ensure that you have a copy everywhere outside of iCloud.
If you use a Windows PC, you don’t need to export your Apple Notes as PDF. There are different ways for you to access and edit your Apple Notes right inside Windows.
Read Next
About The Author


